

This guide is designed to show you how to create a personal voice on the iPhone or iPad with iOS 17. This is a new feature that was recently introduced with the release of the iOS 17 and iPadOS 17 software updates.
This feature allows you to create a synthesized voice that sounds eerily similar to your own, offering a more personalized experience when communicating with family and friends. Whether you’re using FaceTime, phone calls, or assistive communication apps, your Personal Voice can be your new digital identity. In this article, we’ll guide you through the step-by-step process of setting up your Personal Voice on iOS 17.
Prerequisites
Before diving into the setup process, make sure you meet the following requirements:
- Operating System: iOS 17, iPadOS 17, or macOS Sonoma or later
- Device Compatibility:
- iPhone 12 or later
- iPad Air (5th generation)
- iPad Pro 11-inch (3rd generation) or later
- iPad Pro 12.9-inch (5th generation) or later
- Mac with Apple silicon
- Security: Face ID, Touch ID, or a device passcode or password
- Language: Currently, Personal Voice is available only in English.
Creating Your Personal Voice
On iPhone or iPad
- Open Settings: Navigate to the Settings app on your device. Tap on ‘Accessibility’, then tap on ‘Personal Voice’.
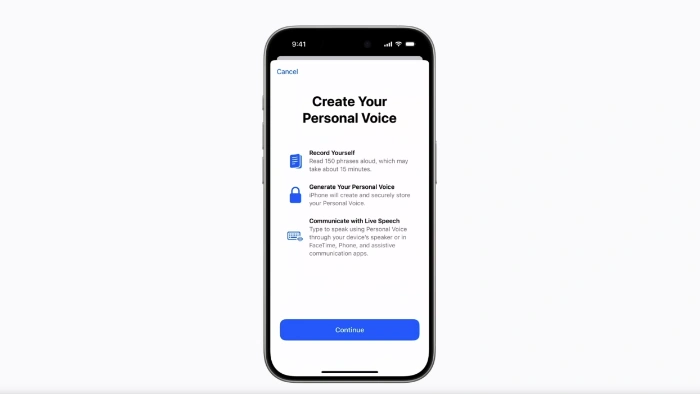
- Initiate Setup: Tap on ‘Create a Personal Voice’.
- Follow Instructions: The on-screen instructions will guide you through recording your voice. You’ll need to read a series of randomly chosen text prompts to record approximately 15 minutes of audio.
To Pause and Resume
- Pause: Tap ‘Done’ or close the Settings app. Your progress will be saved.
- Resume: Go back to Settings > Accessibility > Personal Voice, tap the voice you want to continue creating and tap ‘Continue Recording’.
On Mac
- Navigate to System Settings: Click on the Apple menu > System Settings, then click on ‘Accessibility’ in the sidebar and select ‘Personal Voice’.
- Initiate Setup: Click on ‘Create a Personal Voice’.
- Follow Instructions: Just like on iOS, you’ll be guided through the recording process.
To Pause and Resume
- Pause: Click ‘Done’. Your progress will be saved.
- Resume: Go back to System Settings > Accessibility > Personal Voice, click the ‘Show Detail’ button next to the voice you want to continue creating, and click ‘Continue Recording’.
Deleting a Personal Voice
If you wish to delete a Personal Voice, you can do so but be aware that it cannot be recovered.
On iPhone or iPad
- Open Settings > Accessibility > Personal Voice.
- Tap the voice you want to delete.
- Authenticate using Face ID, Touch ID, or enter your passcode.
- Tap ‘Delete Voice’ and confirm.
On Mac
- Navigate to System Settings > Accessibility > Personal Voice.
- Click the ‘Show Detail’ button next to the voice you want to delete.
- Enter your password.
- Click ‘Delete Voice’ and confirm.
Additional Features
- Live Speech: Type to speak using your Personal Voice.
- Share Across Devices: Sync your Personal Voice to other devices signed in to iCloud with your Apple ID.
- Privacy and Security: Your Personal Voice is encrypted and stored securely on your device.
Summary
Creating a Personal Voice in iOS 17 is a straightforward process that offers a more personalized and secure way to interact with your digital world. With just a few steps, you can have a synthesized voice that sounds just like you, enhancing your communication experiences. You can find out more details about the Personal Voice Feature for the iPhone and iPad over at Apple’s website.
Filed Under: Apple, Apple iPad, Apple iPhone, Guides
Latest aboutworldnews Deals
Disclosure: Some of our articles include affiliate links. If you buy something through one of these links, aboutworldnews may earn an affiliate commission. Learn about our Disclosure Policy.


